Shipping Shopify Theme Changes with GitHub
Last updated: October 8, 2026
At a glance
When a Shopify theme is connected to GitHub, the live theme stays connected to the main branch, and every change reaches the live site by merging a branch into main.
The golden rule: Always leave the live theme connected to main. Test your changes on a preview theme, then merge into main to update the live theme. Never publish the preview theme as the new live theme.
The short version
Create a branch from
main.Make your changes and test them on a preview theme.
Duplicate the live theme as a backup.
Open a pull request into
mainand resolve any conflicts.Merge. The live theme updates automatically.
Clean up preview themes and old branches.
Prefer video? Watch the Loom walkthrough.
Before you start
Check these once before your first change. If the live theme isn't connected to main, sort that out first, since the rest of this workflow depends on it.
The live theme is connected to the
mainbranch through Shopify's GitHub integration (check under Online Store > Themes).You can create branches, open pull requests and merge in the theme's GitHub repo.
The Noibu app embed is turned on for the live theme (Online Store > Themes > Customize > App embeds).
Optional: Claude has access to the repo, if you want it to create branches and preview themes for you.
How the setup works
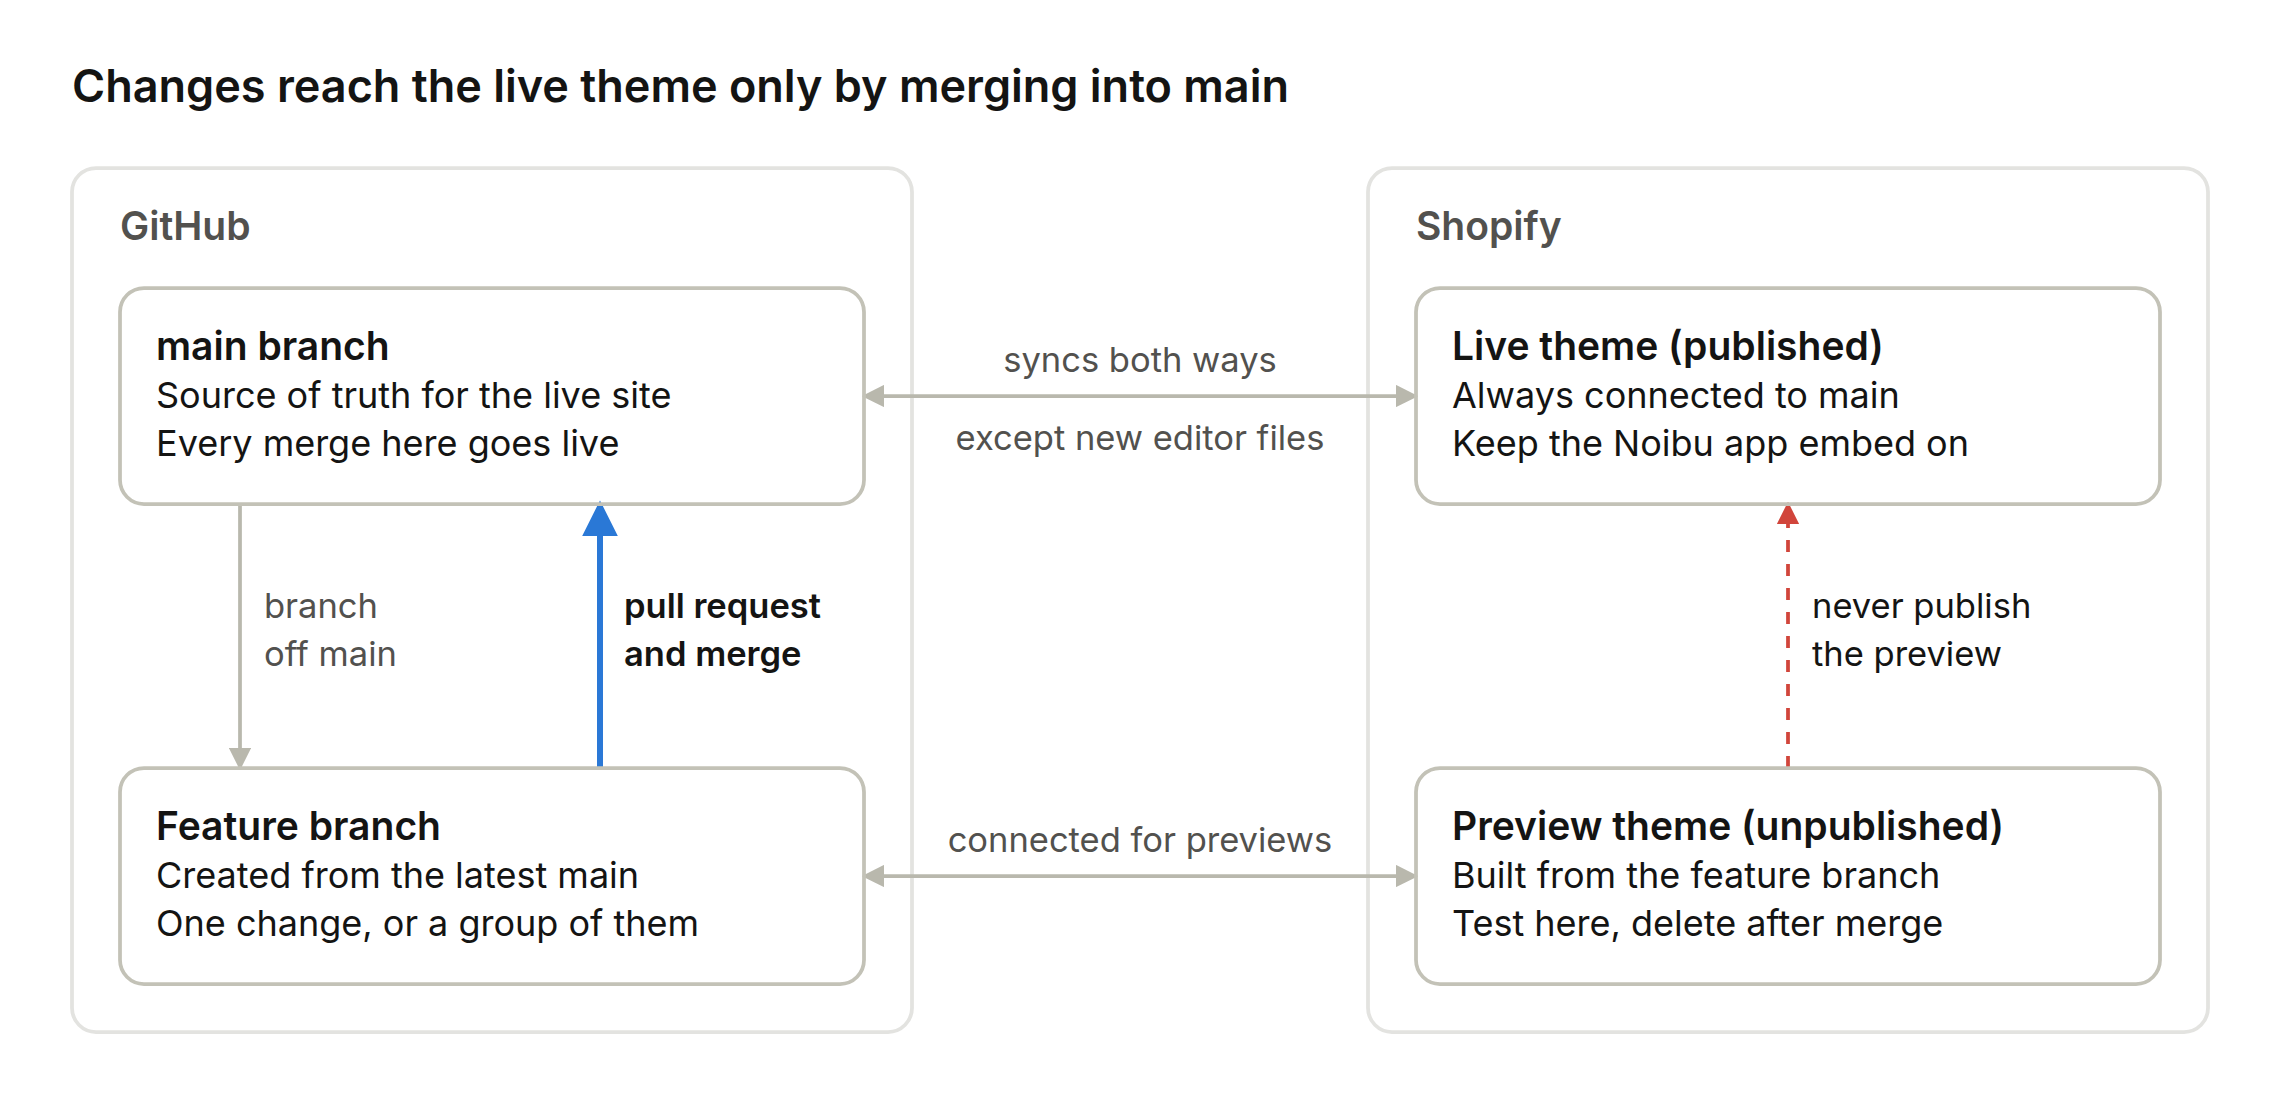
Each branch is connected to its own theme and syncs with it. The only route from a feature branch to the live site is a pull request merged into main.
Step-by-step workflow
Six steps take a change from a new branch to the live site without ever unpublishing the live theme.
Step 1: Create a branch from main
Always branch from main, since it holds the latest version of the live site.
One branch per change is the easiest to review and roll back.
You can also group a series of related tech changes on one branch and test them together.
Working with Claude? Run tech-diagnosis or any other Noibu skill as normal, and ask Claude to put the changes on a new branch.
Step 2: Make your changes and preview them
Commit your changes to the branch, then test them on a preview theme built from that branch.
Create the preview theme in one of two ways:
Ask Claude for a preview link. It packages the branch as a theme in Shopify.
In Shopify admin, go to Online Store > Themes > Add theme > Connect from GitHub and pick your branch.
Turn on the Noibu app embed for the preview theme (Customize > App embeds). It's set per theme, so a new preview theme may not have it.
Test your changes using the preview link.
The preview theme is for testing only. Don't publish it.
Step 3: Back up the live theme
Before you merge, duplicate the live theme (Online Store > Themes, then ... > Duplicate on the live theme). If something goes wrong after the merge, you can revert quickly. Leave the copy unpublished unless you need it (see Rolling back below).
Step 4: Open a pull request into main
In GitHub, open a pull request from your branch into main.
If GitHub reports merge conflicts, resolve them before merging.
Conflicts usually mean the live theme was edited in Shopify while your branch was open, since those edits sync back to
main. Keep the live-side changes unless you mean to replace them.
Step 5: Merge into main
Once everything checks out, merge the pull request. The live theme picks up the changes from main automatically, so there's nothing to publish.
Spot-check the live site right after the merge.
Confirm the Noibu app embed is still on for the live theme.
Step 6: Clean up
Tidy up so the theme library and repo stay easy to work with.
Delete the preview theme(s) in Shopify.
Delete the merged branch in GitHub.
Bring any other open branches up to date with the latest
main(use Update branch on their pull request, or mergemaininto them).Once you're confident the live site is fine, delete the backup theme from Step 3.
What not to do
The two shortcuts below both skip main, which is what keeps GitHub and the live site in sync.
Don't | Why it causes problems | Do this instead |
|---|---|---|
Publish a preview theme as the new live theme | Images and assets added through the Shopify editor go missing, the Noibu app embed has to be turned on again, and the live theme is no longer the one connected to | Merge the branch into |
Duplicate the live theme and make changes on the copy | The copy isn't connected to a branch, so the changes never go through GitHub or a pull request | Create a branch from |
Duplicating the live theme is fine as a backup before a merge (Step 3). Just don't use the copy as a place to make changes.
Known issues
Two things don't carry over between themes on their own, and both are why publishing a preview theme goes wrong.
Files added in the Shopify editor don't sync to GitHub
Edits to the live theme sync back to main, but new files (images and other assets) added through the Shopify editor don't, even when the theme is connected to a branch. A theme built from a branch won't have them, which is where missing images come from.
To get new files into GitHub, either upload them to the repo directly, or pull them down with Shopify CLI and commit them:
shopify theme pull --store <your-store>.myshopify.com --theme <live-theme-id>The Noibu app embed is set per theme
The Noibu app embed has to be turned on separately for every theme. If it's off on the published theme, the Noibu script isn't running on the live site. So switching live themes often puts data collection at risk.
Preview themes built from a branch usually need it turned on by hand.
A manual duplicate of the live theme often keeps it, but check anyway.
To check: Online Store > Themes > Customize > App embeds, make sure Noibu is on, then Save.
Rolling back
If a merge breaks something, revert it in GitHub first, and only fall back to the backup theme if you need the site restored immediately.
Option 1: Revert the pull request (preferred)
Open the merged pull request in GitHub and click Revert.
Merge the revert pull request into
main.The live theme updates automatically and stays connected to
main.
Option 2: Publish the backup theme (emergency only)
Publish the duplicate you made in Step 3 to restore the site right away.
Check the Noibu app embed is on for it.
Fix or revert the change on
main, then publish the originalmain-connected theme again as soon as possible. Until then, the live theme isn't connected to GitHub.
FAQ
Can I still edit the live theme directly in Shopify?
Yes. Edits made on the live theme sync back to main in GitHub. Two things to keep in mind: new files you add there won't sync (see Known issues), and any open branches should be brought up to date with main afterwards.
If I'm happy with my preview theme, why not just publish it?
Because the live theme should always be the one connected to main. Publishing a preview can drop images added through the Shopify editor and turn off the Noibu app embed on the live site. Merge into main instead and the existing live theme updates.
Should every change get its own branch?
It's the easiest to review and roll back, but not required. You can group related changes on one branch and test them together, as long as it's created from the latest main.
Do I really need to delete preview themes?
Yes. Shopify limits how many themes a store can hold, and old previews make it easy to publish the wrong one by mistake.