Enabling Logs Integration for Salesforce Commerce Cloud (SFCC)
Last updated: March 20, 2026
Salesforce Commerce Cloud’s (SFCC) logs system captures important server-side information and errors as customers navigate your SFCC site. If your ecommerce store is built on Salesforce Commerce Cloud’s SiteGenesis (SG) or Storefront Reference Architecture (SFRA), Noibu’s SFCC logs integration enables you to ingest important error, warning, and fatal logs into Noibu. This gives development teams a unified view of server-side and client-side errors without needing to switch between systems.
Data Collected from SFCC Logs
Salesforce Commerce Cloud records several logs types, but Noibu only ingests those that are indicative of a customer-impacting failure: error, customerror, warn, customwarn, and fatal. These logs are collected in real-time, and are retained in our systems for a full 30 days, as compared to the standard retention period for SFCC’s Business Manager Log Center.
Note that enabling this feature may potentially share customer personally identifiable information (PII), and you should ensure your site has the appropriate consent mechanisms in place. Note our Privacy Disclaimer at the bottom of this article. Once configured, the SFCC logs integration will present log data on the Logs page in Noibu, as well as in the context of session replays.
Enabling SFCC Logs Integration
1. Retrieve the SFCC Session ID and pass it as a custom attribute in Noibu
A preliminary step for the log integration is to configure a custom attribute that passes the SFCC session ID from your logs as a custom attribute. We use this value to associate your SFCC logs with our session data, enabling us to display logs within corresponding session timelines.
Note: if you have deployed Noibu via our SFCC cartridge, this custom attribute is captured automatically. You can skip directly to step 2.
If you have not deployed Noibu using the SFCC cartridge, you will need to complete the following steps to configure the custom attribute manually.
1.A) Retrieve the SFCC Session ID.
To link SFCC logs with Noibu session recordings, you need to extract a truncated Session ID from the dwsid HTTP cookie. This truncated ID consists of the first 10 characters of the dwsid value.
Important: Do not confuse the dwsid cookie with the sid cookie—they are different.
Access the
dwsidcookie: Retrieve the full value of thedwsidcookie from the HTTP request.Truncate the session ID: Extract the first 10 characters of this value.
Store the truncated ID in
pdict: Assign this 10-character session ID to a property in thepdictobject.exports.htmlHead = function (pdict) {
var cookies = request.getHttpCookies();
var dwsid = "";
var truncatedSessionId = "";
for (var i = 0; i cookies.getCookieCount(); i++) {
if (cookies[i] && cookies[i].name == "dwsid") {
dwsid = cookies[i].value;
}
}
if (dwsid && !empty(dwsid)) {
truncatedSessionId = dwsid.substring(0, 10);
}
if (pdict) {
pdict.truncatedSessionId = truncatedSessionId;
}
};
1.B) Use the app.template.afterFooter hook to render an ISML template.
exports.afterFooter = function (pdict) {
  var ISML = require("dw/template/ISML");
  ISML.renderTemplate("noibu_custom_attribute");
};
Validate that the value retrieved is correct by comparing it to the
dwsidcookie value in the your browser's Developer tab. Open the Developer tab, selectApplication, and clickCookies.Select your domain, and filter the list by typing
dwsid. Verify that the first 10 digits of the cookie value match the value you set into thesfcc-session-idcookie. It should look something like this: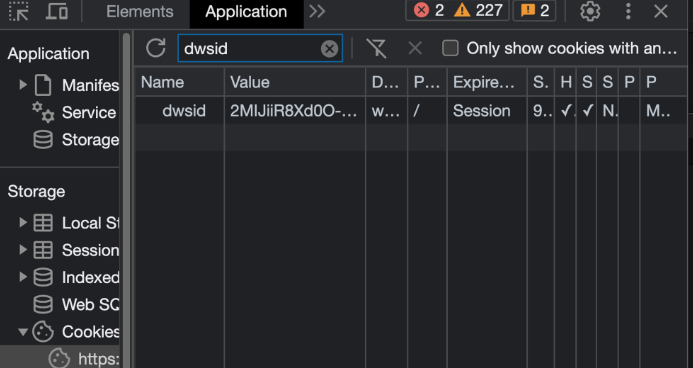
1.C) Pass the SFCC Session ID to Noibu via NoibuJS SDK
Once you have access to your domain's SFCC session ID, you must send the SFCC session ID as a custom attribute using the addCustomAttribute function from the NoibuJS SDK.
Use the following snippet to attach the sfcc-session-id as a custom attribute.
<isif condition="${pdict.truncatedSessionId}">
<script>
 function checkSDKExistanceAndAddCustomAttribute() {
   const sdkCheck = setInterval(() => {
     if (window.NOIBUJS && window.NOIBUJS.addCustomAttribute) {
       clearInterval(sdkCheck);
       window.NOIBUJS.addCustomAttribute("sfcc-session-id", "${pdict.truncatedSessionId}");
     }
   }, 3000);
 }
 checkSDKExistanceAndAddCustomAttribute();
</script>
</isif>
This script checks for the availability of the NoibuJS SDK on every page before attempting to register the attribute. It also assumes you already have a cookie called sfcc-session-id that contains the first 10 symbols of the SFCC session id.
2. Request a unique API token from your Noibu CSM
Reach out to your Noibu CSM to request an API token to use when setting up a new SFCC log stream.
The log stream can be enabled for any of your domains in Noibu. To ensure we’re ingesting the correct logs for each one, please provide the following SFCC details for each domain:
Realm nameTenant IDTenant typeSite name
These values can be seen by logging into your SFCC’s log center and using the search filters on the left-side of the page. Our team will provide you with a unique API token for each SFCC realm which you can use in the following step.
3. Enable Log Streaming in Salesforce Commerce Cloud
Following the instructions detailed here, create a log stream for Noibu in SFCC using the following settings:
Name | This can be any value, e.g. “Noibu” |
Destination Type | Select “Generic HTTP” from dropdown |
Endpoint URL | https://firehose.data.noibu.com |
API Token | To be provided by your CSM in Step 2 |
Realm | Choose the SFCC realm associated to your domain(s) in Noibu |
Edit Permission List | (this can be ignored) |
Enable Notification | (this can be ignored) |
Notification Time | (this can be ignored) |
Filters | Severity = ERROR,FATAL,WARN |
Negative Filters | (this can be ignored) |
Parameters | (this can be ignored) |
Click the Save button to complete your Log Streaming configuration.
As you explore this feature, we encourage you to share your thoughts and feedback to help shape the final product as it moves out of beta. Learn more about how to use our Salesforce Commerce Cloud logs integration.
Privacy Disclaimer
For this log integration, Noibu acts as a secondary data processor, ingesting logs exactly as they are received from SFCC. This ensures consistency but also means any PII present in SFCC logs will appear in Noibu. We implement automated masking to mask full credit card numbers, however other PII information will remain.
For customers sharing personal information (PII), a Data Processing Agreement (DPA) may be required to ensure compliance with regulatory obligations. If you do not have a DPA in place, please contact privacy@noibu.com for assistance.