Deploying Noibu to Shopify Headless & Hydrogen
Last updated: November 17, 2026
Noibu supports full session recording, error detection, and performance monitoring across the entire customer journey on Shopify merchant sites. Customers using Shopify Headless or Shopify Hydrogen can easily deploy Noibu’s eCommerce monitoring platform to their checkout via the Shopify App Marketplace, and to the rest of their storefront via Google Tag Manager.
Note: if you’re an existing Noibu customer who has previously deployed Shopify using our collect-core.js script or custom pixel, you’ll need to remove these settings first. Learn how here.
Step 1 - Install Noibu App for Shopify Checkout
1. Go to Noibu’s app listing on the Shopify App Store and click ‘Install’. Log in if required.

2. You’ll be redirected to the Noibu app installation page within Shopify. Click the ‘Install’ button to confirm your installation.

3. Complete your setup by following the guided steps within Shopify.
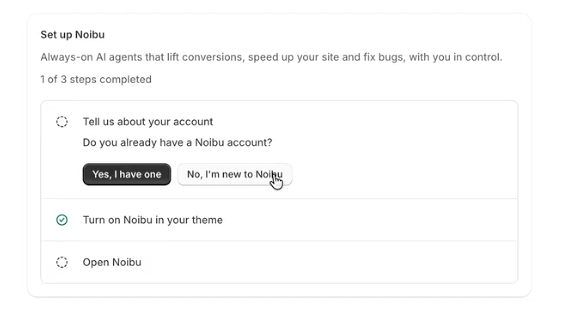
Tell us about your store.
Turn on Noibu in your Shopify theme.
Note that Noibu is enabled per theme. If you publish a different theme later, repeat these steps on it. Leave the embed off on unpublished themes you don't use.
Finish connecting to Noibu.
If you're a Noibu customer, log in
If you're not yet a Noibu customer, you'll connect with our team to complete your domain configuration and Noibu deployment.
Step 2 - Deploy Noibu Script for Shopify storefront
1. Log into your Google Tag Manager account and click Add a New Tag.
2. Click Tag Configuration. This opens a menu of options. Select Custom HTML.

3. Paste the following script into the HTML box and click Save.
<script src="https://cdn.noibu.com/collect-core.js"></script>4. Configure the tag's triggers to determine how the script will activate. Click Add Trigger.

5. Select All Pages. This ensures the Noibu script will track activity across all pages of your ecommerce store. Set the trigger's Type to Initialization or Page View.

6. Click Save. Enter a unique name for the tag–we recommend simply naming the tag Noibu–and click Save.

7. Click Submit to finalize the tag and publish the changes to your eCommerce site.

8. Click Publish and Create Version.
Enter Noibu in the Version Name field.
Enter Noibu Error Monitoring in the Version Description field.
Click Publish.
