Sending Noibu Alerts to Microsoft Teams
Last updated: November 6, 2026
This guide shows you how to send Noibu alerts to a Microsoft Teams channel as a clear, readable card. Each card shows the issue, its priority and its revenue impact, with a button that opens the issue in Noibu.
Estimated time: about 15 minutes per domain.
Noibu sends alerts in Slack's message format, which a standard Teams webhook can't read, so alerts arrive empty or not at all. In this guide, you change the Teams workflow so it reads Noibu's format and turns each alert into a card.
What the alert card shows
Title: a coloured circle for the alert's priority (red, orange, yellow or green) and the issue number, for example "Issue #75911".
Subtitle: the alert rule that fired and the domain.
Body: annualized revenue loss, sessions and insight tags.
Button: opens the issue in Noibu in one tap.
The card doesn't include the error title or description, because they aren't part of the alert message Noibu sends.
Before you start
You'll need the following. These can be different people on your team.
Microsoft Teams: permission to add a workflow to the channel that should receive alerts.
Power Automate: access to
make.powerautomate.comwith the same Microsoft account, so you can edit that workflow.Noibu: access to Settings → Domains for the domain you want alerts from, and permission to edit its alerts.
Important: The webhook URL is a secret. Anyone who has it can post to your channel, so share it only with the people setting up the Noibu side.
Step 1: Create the webhook in Teams
Use the Teams Workflows app. Microsoft is retiring the older Incoming Webhook connector.
In Teams, open the channel that should receive alerts. Select the three dots (...) next to the channel name and choose Workflows.
Search for the template Send Webhook Alerts to a Channel and select it.
Name the workflow (for example,
Noibu alerts), confirm the team and channel, and select Add workflow.Copy the webhook URL shown on the last screen. It's long and includes a signature, so make sure you copy all of it.
If you don't see the Workflows app or the template, ask your Microsoft 365 admin to allow it for your account. For more detail, see Microsoft's guide to creating incoming webhooks with Workflows for Microsoft Teams.
Step 2: Add the Noibu card to the workflow
The default workflow expects a Teams card, so you replace it with a card that reads Noibu's format. Noibu's alerts always take the True branch of the workflow, so that's the only part you change.
Open
make.powerautomate.comand go to My flows. Open the workflow from Step 1 and select Edit.Expand the Attachments is null condition. Under True, open Post card in a chat or channel.
Click in the Adaptive Card box, delete everything in it, and paste the card below exactly as one line.
Select Save.
{"type":"AdaptiveCard","$schema":"http://adaptivecards.io/schemas/adaptive-card.json","version":"1.4","body":[{"type":"TextBlock","size":"Large","weight":"Bolder","wrap":true,"text":"@{if(contains(coalesce(triggerBody()?['blocks']?[0]?['text']?['text'],''),'red_circle'),json('"\ud83d\udd34"'),if(contains(coalesce(triggerBody()?['blocks']?[0]?['text']?['text'],''),'orange_circle'),json('"\ud83d\udfe0"'),if(contains(coalesce(triggerBody()?['blocks']?[0]?['text']?['text'],''),'yellow_circle'),json('"\ud83d\udfe1"'),if(contains(coalesce(triggerBody()?['blocks']?[0]?['text']?['text'],''),'green_circle'),json('"\ud83d\udfe2"'),''))))} @{first(split(last(split(coalesce(triggerBody()?['blocks']?[0]?['text']?['text'],''),'| ')),' :'))}"},{"type":"TextBlock","wrap":true,"isSubtle":true,"spacing":"None","text":"@{replace(first(split(last(split(coalesce(triggerBody()?['blocks']?[1]?['text']?['text'],''),'|')),'>')),'"','\"')} - @{first(split(last(split(coalesce(triggerBody()?['blocks']?[1]?['text']?['text'],''),'domain *')),'*'))}"},{"type":"TextBlock","wrap":true,"text":"@{replace(replace(replace(coalesce(triggerBody()?['blocks']?[2]?['text']?['text'],''),'*','**'),decodeUriComponent('%0A'),'\n\n'),'"','\"')}"},{"type":"TextBlock","wrap":true,"isVisible":@{if(empty(coalesce(triggerBody()?['text'],'')),'false','true')},"text":"@{replace(coalesce(triggerBody()?['text'],''),'"','\"')}"}],"actions":[{"type":"Action.OpenUrl","title":"@{replace(coalesce(triggerBody()?['blocks']?[4]?['elements']?[0]?['text']?['text'],'Open in Noibu'),'"','\"')}","url":"@{coalesce(triggerBody()?['blocks']?[4]?['elements']?[0]?['url'],'https://console.noibu.com')}"}]}After saving, open Code view on the action. The card should appear under body/messageBody unchanged. If any straight quotes were changed to curly quotes, paste the card again.
Step 3: Add the webhook to Noibu
In Noibu, go to Settings → Domains.
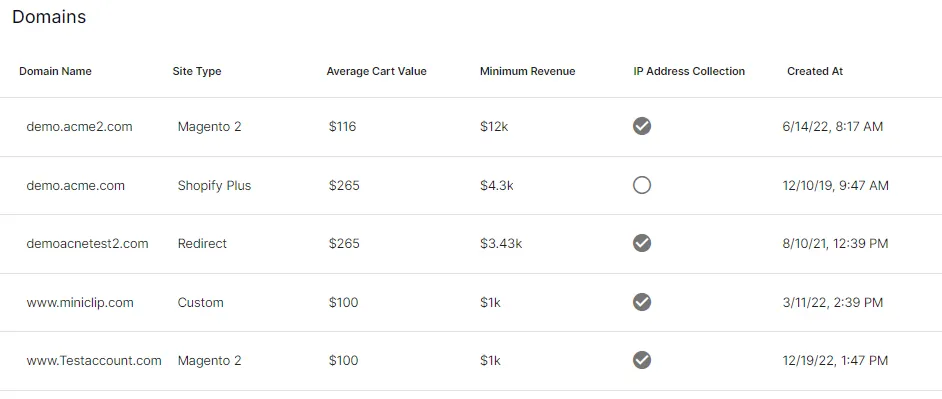
Select the domain and open the General tab.
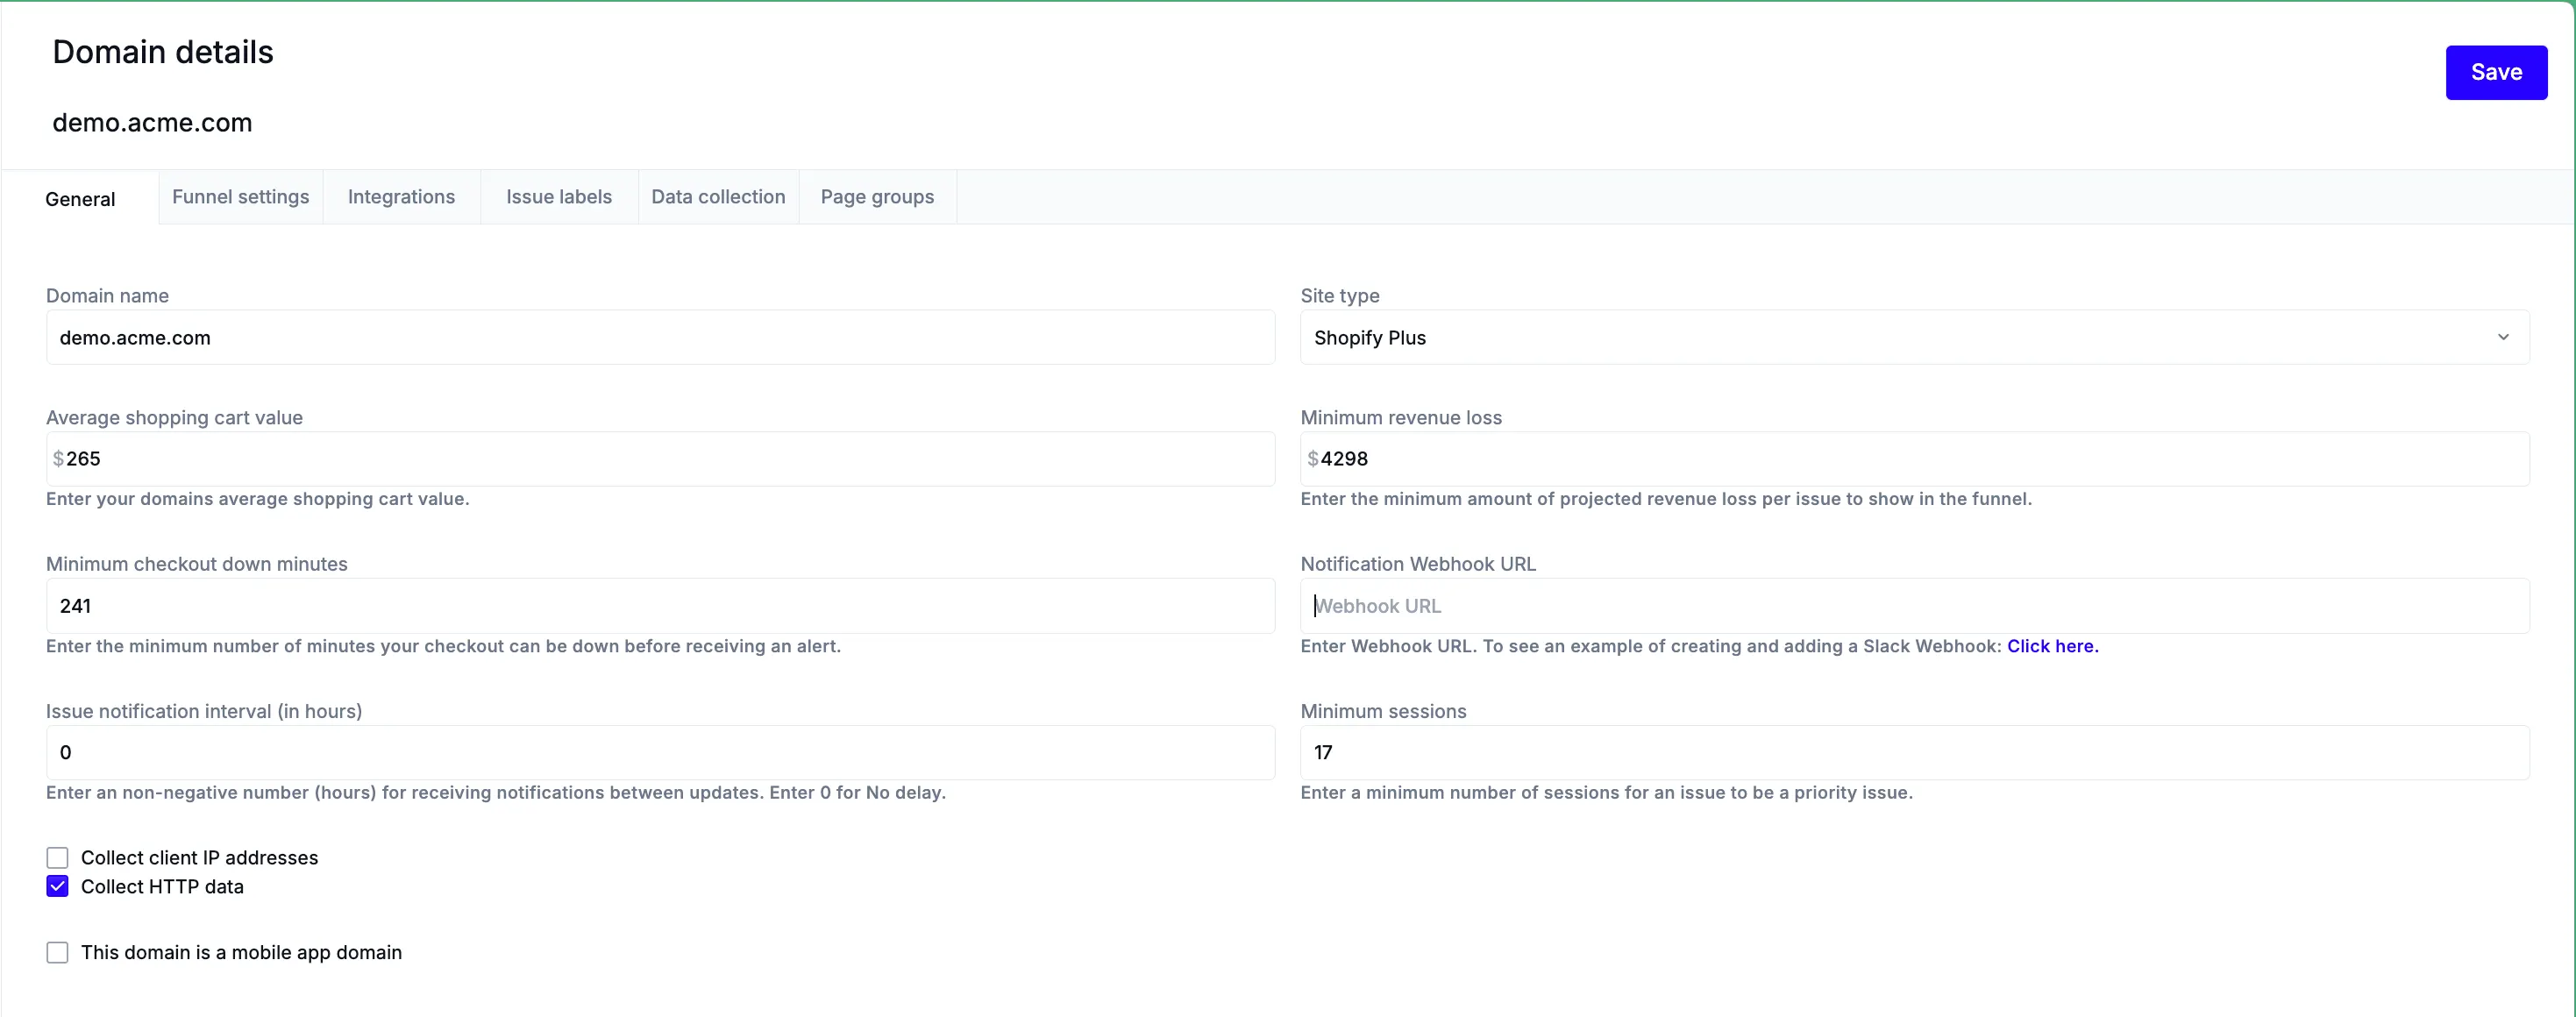
Paste the Teams webhook URL into the Notification Webhook URL field and select Save. The field may be labelled "Slack" in places, but it accepts Teams workflow URLs.

Go to Alerts and open the alert you want in Teams, or create a new one. Turn on the webhook as a destination for that alert and save it.
If the alert also emails your Teams channel's own email address, remove that address from the recipients. Otherwise you'll get a duplicate post with an .eml attachment.
Alerts are set per domain, so repeat Steps 1 to 3 for each domain that should post to Teams.
Step 4: Test with a real alert
Important: The Test button in Noibu only sends a short one-line message, so it won't show the full card. Check the layout with a real alert instead.
Wait for a real alert to fire, or temporarily lower the threshold on a test alert so it triggers.
In Teams, check that a card appears with the priority circle, issue number, alert name, revenue, sessions and button.
Select the button and check that it opens the issue in Noibu.
If nothing appears, see Troubleshooting below.
Troubleshooting
Start in Power Automate: open the workflow, check Run history, and open the latest run. A red Failed run shows which step failed and why. To see exactly what Noibu sent, select the first step (When a Teams webhook request is received) and choose Show raw outputs.
No runs appear in Run history. Noibu isn't reaching the workflow. Paste the URL into the domain's settings again and save, then check that the alert has the webhook turned on.
The run failed with "adaptive card request is missing or invalid". The default card is still in the workflow. Replace the card in the True branch with the card from Step 2.
The run failed with "message body is invalid JSON". Part of the card changed or went missing when you pasted it. Paste it again as one line and check it in Code view.
The run succeeded but the card is mostly empty. The card was pasted into the False branch, or an older card is still in the True branch. Check the True branch of Attachments is null and paste the card again.
There's no coloured circle in the title. The alert's priority colour wasn't red, orange, yellow or green. Open the run's raw outputs and send the first line of the message to Noibu support.
Noibu won't save the URL. The URL was likely cut off when you copied it. Copy the whole URL again from the Workflows screen. If it's still rejected, contact Noibu support.
When you contact Noibu support at support@noibu.com, include the failed run's raw outputs and a screenshot of the failed step. The raw outputs include your webhook URL, so delete the signature (the part after sig=) before sending.