Connecting GitHub to Shopify (for use with Claude)
Last updated: June 17, 2026
When a Noibu skill for Claude finds a problem in your Shopify theme, it can do more than recommend a fix — it can open a pull request with the change already written, ready for you to review and merge. A pull request is GitHub's standard way to propose a code change and review it before it goes live. For that, Claude needs access to a GitHub repository that holds your theme code, and your Shopify store needs to connect to that same repository.
This guide covers the one-time setup that enables that workflow. It has two parts:
Part 1 — get your existing Shopify theme into a GitHub repository and connect Shopify to it.
Part 2 — give Claude's GitHub connector access to that repository so it can read the theme code and open pull requests.
This guide is for the person setting up the connection — typically a developer, agency, or technical partner working on the store. If more than one person will use Claude against the same repository, read Setting this up for a team first, because it affects a decision you make in Part 1.
Important: This connection does not give Claude write access to your store. Claude opens a pull request in GitHub; you review and merge it; Shopify's own GitHub integration deploys the merged change to your theme. Nothing reaches your live site until you approve it. Like the rest of the Noibu plugin, this keeps Noibu read-only on your store: every change is one you apply, not one Claude pushes on its own.
Before you start
You'll need:
A Shopify admin login for the store
A GitHub account
GitHub Desktop installed
A Claude plan with access to connectors. On Team or Enterprise plans, an Owner must add the connector at the organization level first (covered in Part 2).
Setting this up for a team
Read this first if more than one person will use Claude against the same repository.
The steps below assume one person doing everything on their own account. If several teammates need Claude to read the theme code and open pull requests, each of them must reach the repository from their own GitHub account — and a private repository is invisible to everyone except its owner until you grant access. Decide ownership before you create the repository in Part 1, because it determines where you publish it.
Decide who owns the repository:
Organization-owned (recommended for teams). Create the repository under a GitHub organization and add teammates as organization or team members. You manage access in one place, and you install the Claude GitHub app once on the organization rather than once per person. When you publish in Part 1, choose the organization — not your personal account — as the owner.
Personal account with collaborators. Fine for one or two people. The repository lives under one person's account, and that person invites each teammate individually.
Add teammates to the repository:
Personal repository: On GitHub, go to the repository, then Settings → Collaborators → Add people, and invite each teammate by username. They'll receive an email invitation to accept.
Organization repository: Add each teammate to the organization (or a team within it) and give the team access to the repository under the repository's Settings → Collaborators and teams.
Each teammate still connects their own Claude. Repository access alone does not connect Claude — everyone who wants to use the connector must complete the Part 2 authorization themselves, with their own GitHub account. The app installation (Part 2, layer 2) only needs to happen once, on the account or organization that owns the repository.
Note: If a teammate gets a 404 error on the repository, they're almost always missing repository access — they haven't been added as a collaborator or organization member. It is rarely a broken connector.
Part 1 — Connect GitHub to your Shopify store
Estimated time: 15–20 minutes.
This part takes the theme you already run on Shopify, stores it in a GitHub repository, and links Shopify to that repository so merged changes deploy automatically.
Download your theme from Shopify admin
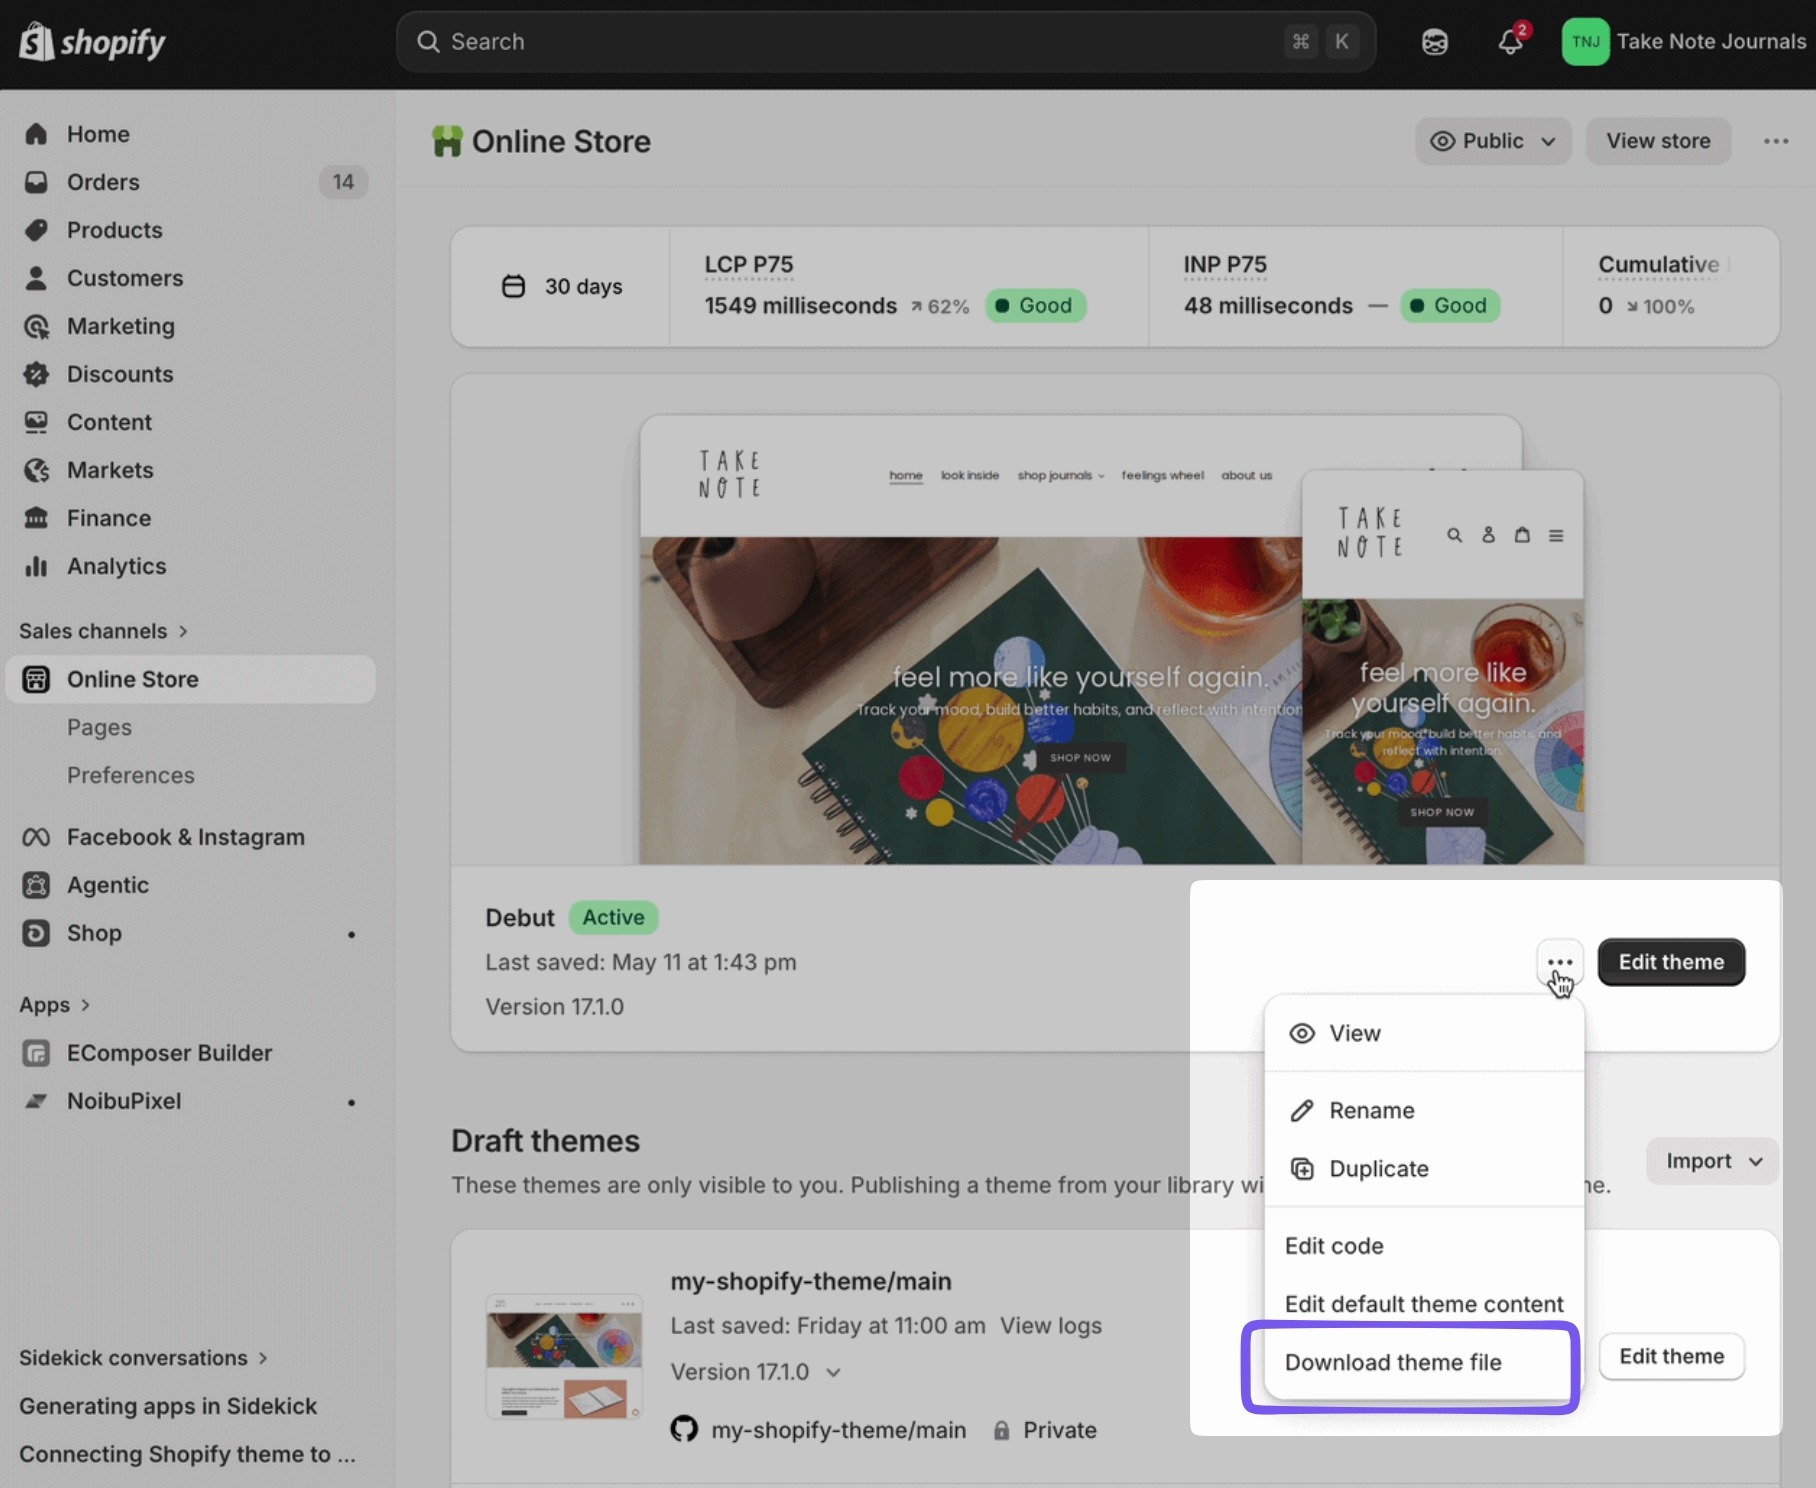
Download your active Shopify theme: Shopify admin → Online Store → Themes → ⋯ → Download theme file.
Shopify emails you the theme file — this may take a few minutes. Unzip it and save the folder to your desktop.
Create a GitHub repository
Create a GitHub account if you don't already have one, at github.com/signup.
Open GitHub Desktop and make sure you're signed in (File → Options → Accounts if you need to log in).
Start a new repository: click File → New Repository in the menu bar, or, on the welcome screen, click Create a New Repository on your hard drive. On Mac the shortcut is ⌘N.
Fill out the fields:
Name — your repository name. Use lowercase with hyphens; keep it short and descriptive so the purpose is clear from the name; stick to letters, numbers, and hyphens; and avoid version numbers or dates, since Git tracks that for you.
Description — optional; a short summary of the project.
Local path — click Choose to pick the folder on your computer where the repository will live.
Initialize this repository with a README — check this to start with a README file (recommended).
Git ignore and License — can be left as is.
Click Create Repository. GitHub Desktop creates the folder locally and makes the first commit.
Copy the theme files you downloaded earlier into the local repository folder.
Commit the files: in GitHub Desktop, type a short summary in the bottom-left box (for example, "Add theme files") and click Commit to main.
Publish the repository to GitHub: click Publish repository in the top toolbar, choose the account or organization, and confirm. Keep the repository private — theme code often contains app configuration you don't want public.
Note: If you're setting this up for a team, the account-or-organization choice in the last step is the ownership decision from Setting this up for a team. Pick the organization if teammates will share the repository, so you don't have to redo this later.
Connect Shopify to the repository
In Shopify, go to Online Store → Themes → Add theme → Connect from GitHub, and select the repository and branch you just published.
Publish the GitHub-connected theme in Shopify. This replaces your current live theme. The old theme stays in your theme library, so you can switch back at any time.
Once connected, any change merged into the linked branch deploys to the theme automatically. This is what makes pull-request-based fixes possible: when you merge a pull request Claude opened, the fix goes live through Shopify's own deployment.
Part 1 is complete when the theme in Shopify admin shows "Connected to GitHub" with your repository and branch name.
Part 2 — Connect Claude to the GitHub repository
Estimated time: about 10 minutes.
The connection has two separate layers, and you must complete both:
Authorization — proves your identity. This happens when you add the GitHub connector in Claude and approve the prompt. After this step, Claude can see your profile but not your repository contents.
App installation — grants access to repository contents. You install the Claude GitHub MCP Connector app on the account or organization that owns the repository and select which repositories Claude can access.
Identity alone is not enough to read repository contents. You need both layers: authorize your identity, then install the app with the theme repository selected.
Add the GitHub connector in Claude
In Claude, add the GitHub connector as a custom connector and approve the prompt with the GitHub account that owns — or has access to — the theme repository.
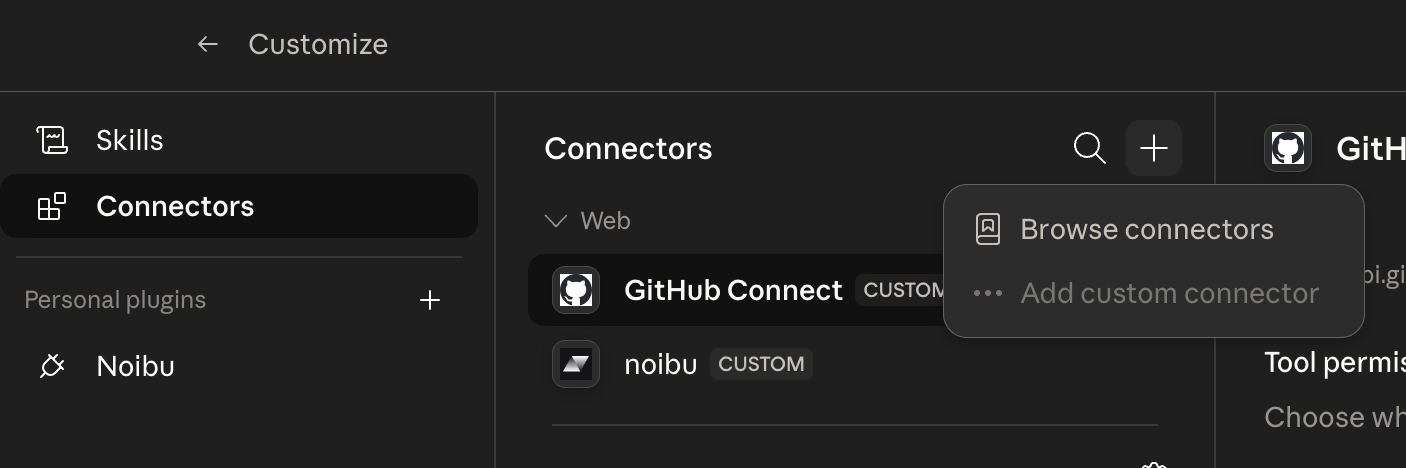
On Pro or Max plans: go to Settings → Connectors, click the + button next to Connectors, and choose Add custom connector. Name it, paste
https://api.githubcopilot.com/mcpas the remote MCP server URL, and click Add.On Team or Enterprise plans: an Owner or Primary Owner adds the connector at the organization level first, under Organization Settings → Connectors → Add. After that, individual members connect to it themselves: go to Customize → Connectors, find the custom connector in the list (it will have a Custom label), and click Connect to authenticate.
Install the Claude GitHub MCP Connector app
Install the Claude GitHub MCP Connector app from github.com/apps/claude-github-mcp-connector on the account or organization that owns the repository.
On the installation screen, grant access to the theme repository (or to all repositories, if you prefer).
Back in Claude, confirm the connection by asking it to open the repository — for example, "check you can see owner/repo-name."
With GitHub connected, Claude can package a fix as a pull request instead of handing the diagnosis off to engineering manually. You review the proposed change in GitHub, merge it when you're satisfied, and Shopify deploys it to your theme.
Troubleshooting
Claude reports a 404 Not Found on a private repository. A 404 — rather than a "permission denied" error — usually means you haven't granted access, which points to a missing app installation (layer 2) or a repository you didn't include in it. Check GitHub Settings → Applications → Installed GitHub Apps. If the Claude app isn't listed, install it from the link in Part 2.
Repository search returns nothing at all. Same cause: with no app installation, the connector has access to zero repositories.
You use different email addresses across tools. Using one email for Claude and another for GitHub is not a problem — GitHub authenticates by account, not by email. Just make sure both the authorization and the app installation are done on the account that actually owns the repository.
You granted access but Claude still can't see the repository. Re-authorize the connector in Claude to refresh its token. Access changes sometimes don't take effect until you reconnect, and it can take a second attempt.
The repository is owned by an organization. The app must be installed on the organization, not your personal account, and an organization admin may need to approve it.