Connecting GitHub to Shopify to Claude
Last updated: August 19, 2026
The Tech Diagnosis skill investigates technical and performance problems on your store using Noibu data — JavaScript errors, failed requests, checkout-blocking bugs, and Core Web Vitals. It summarizes the issue, traces the likely cause, and recommends a fix.
When the fix belongs in your theme code, the skill can help you push it — but only if Claude has been given access to the code.. This guide sets up that connection.
What you'll end up with
Your theme code will live in a GitHub repository — a folder for your code, stored online, that keeps a history of every change. Both Claude and Shopify connect to that same repository:
Claude reads your theme code, so it can work with the actual files behind a problem instead of describing the fix in the abstract.
Shopify watches the connected folder and updates your theme whenever that branch changes.
Before you start
You'll need:
A Shopify admin login for the store
A GitHub account — free to create at github.com/signup
GitHub Desktop installed on your computer (recommended)
Claude on a Pro, Max, Team, or Enterprise plan, with the Noibu plugin installed in Claude Cowork. On Team or Enterprise, an Owner has to add the connector for your organization before members can use it — see Step 5.
This guide is written for whoever manages the store's code: a developer, an agency, or a technical partner.
Step 1 — Download your theme from Shopify
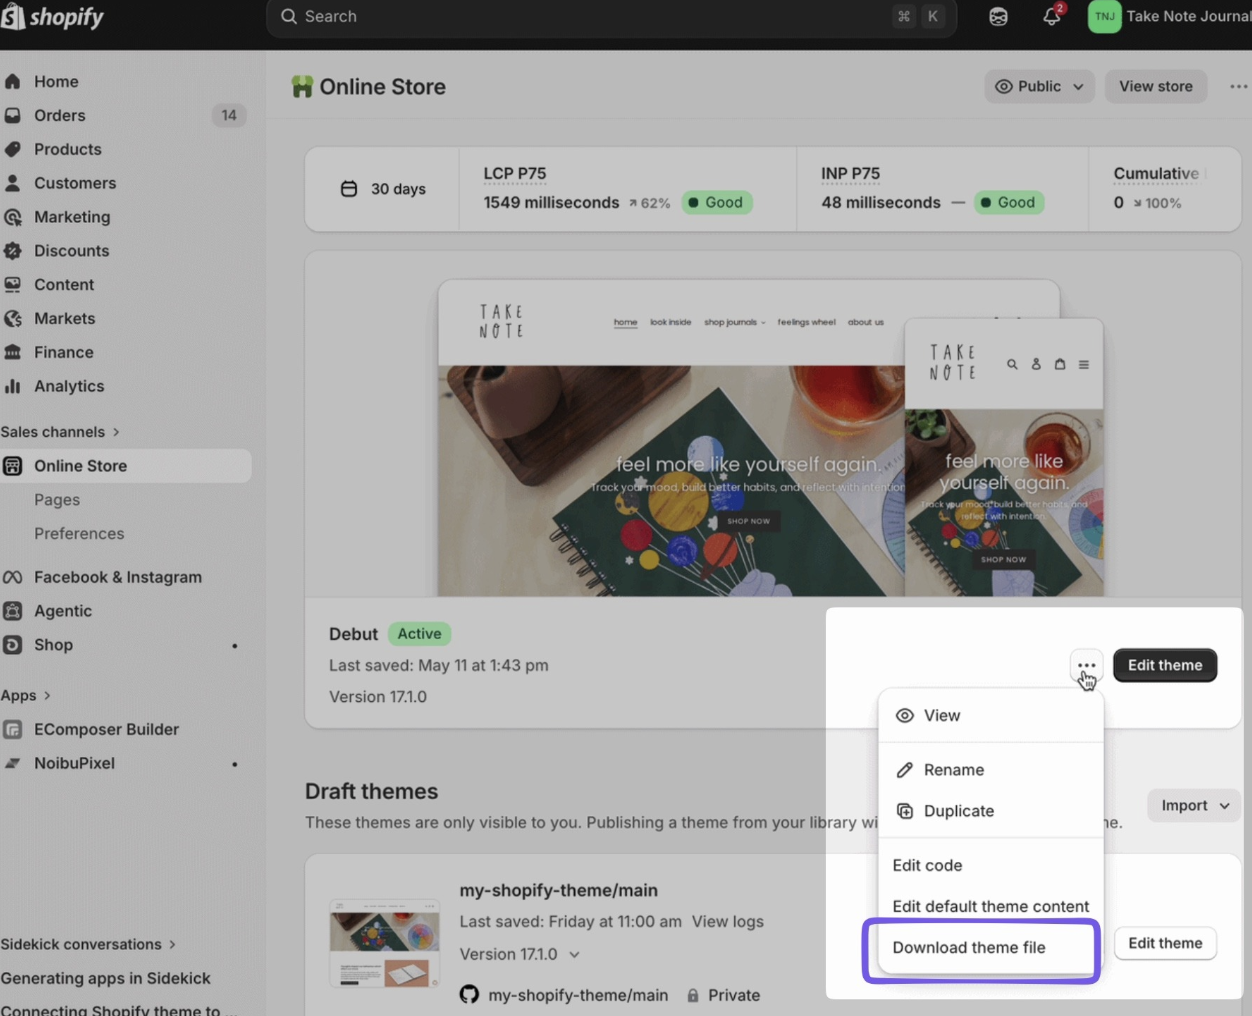
In your Shopify admin, go to Online Store → Themes.
Find your live theme, click the ⋯ menu, and choose Download theme file.
Shopify emails you a download link. This can take a few minutes.
Download the file, unzip it, and leave the folder somewhere easy to find, like your desktop.
Step 2 — Put your theme in a GitHub repository
You'll create the repository on your computer first, add your theme files, then publish it to GitHub.
Open GitHub Desktop and make sure you're signed in to your GitHub account.
Go to File → New Repository. Give it a short, descriptive name and choose where it should live on your computer, then create it.
Open the folder you unzipped in Step 1 and copy everything inside it into your new repository folder. Copy the contents, not the folder itself — see the note below.
Back in GitHub Desktop, type a short summary of the change in the commit box at the bottom left — something like
Add theme files— and commit it.Click Publish repository.
In the Publish Repository window, select Keep this code private. Theme code often contains app configuration you don't want public.
If you're publishing to an organization rather than your own account, choose it from the Organization drop-down, then click Publish repository.
Copy the contents, not the folder itself. Your repository folder should end up looking like the inside of the unzipped theme — the theme's folders and files sitting at the top level. If you instead see a single folder containing all of them, everything is one level too deep. Shopify can only connect branches that match its standard theme folder structure, and folders that don't match are ignored — So make sure the contents are at the root of the folder.
If teammates will share this repository, publish it to an organization. Shopify can't see personal repositories where someone is a collaborator rather than the owner, so your teammates wouldn't find the repository in Shopify's list. Changing owners later means reinstalling the Shopify GitHub app and reconnecting the theme, which creates a new theme rather than restoring the existing connection. Shopify's GitHub integration documentation covers organization access and repository limitations in full.
Step 3 — Install the Shopify GitHub app
This app is what lets Shopify see your repository. Install it before you try to connect anything in Shopify, or your repository won't appear in the list.
Install the Shopify GitHub app on the GitHub account or organization that owns your theme repository.
When it asks which repositories Shopify can access, choose either all repositories or only the repositories holding theme code. See the note below for which to pick.
🔒 Why only one repository? If you grant the app access to repositories in a GitHub organization, anyone in that organization who has the Shopify Manage themes or Themes permission can see every repository the app can access. Limiting it to the theme repository keeps your other projects out of view. If you want to connect another repository later, you'll grant access to it separately in GitHub.
Troubleshooting
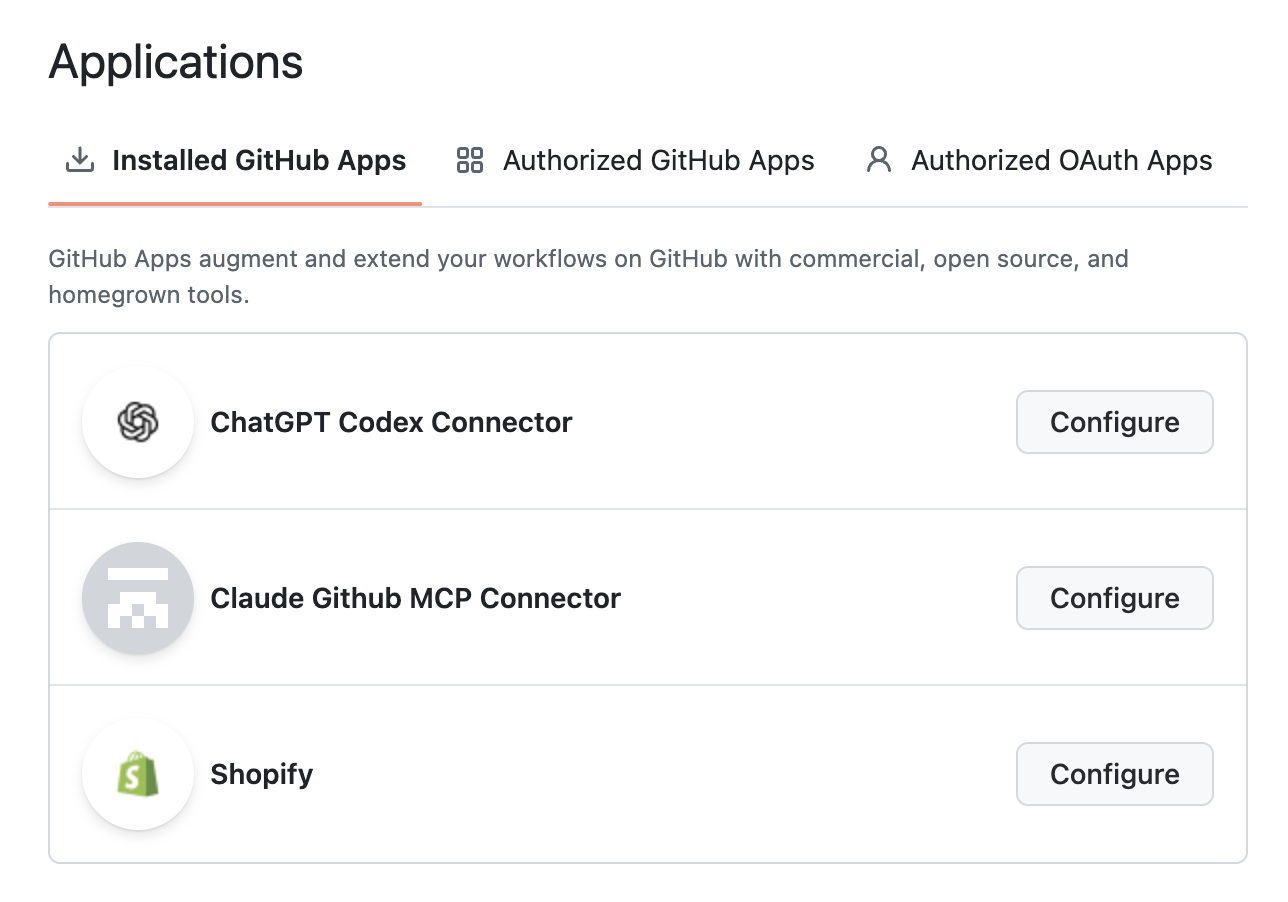
If Claude cannot read the Github Repository, or if the repository you want to connect to is not available, this means Claude does not have access to read the repo you are trying to connect to. A user with Github Admin must grant Claude access to the repo you are trying to connect to.
In Github, go to Settings
Go to Integrations -> Applications
Configure the appropriate app:
Step 4 — Connect the repository to your theme
In Shopify, go to Online Store → Themes.
In the Theme library section, click Add theme → Connect from GitHub.
In the Connect theme pane, select your organization or account.
Under Repository, select your theme repository.
Under Branch, search for the branch you want to connect. This is usually
main.Wait for Shopify to finish pulling the theme from the repository. This can take several minutes, and Publish stays greyed out until it's done.
Publish the connected theme.
Publishing makes this theme your live one. Your previous theme stays in the theme library, so you can switch back at any time.
You'll know this worked when the theme card in Shopify shows your repository name, branch name, and the time of the last commit.
This is a Two-way sync. Any change to the connected branch updates the theme in Shopify. And when the theme is edited through the Shopify admin — the theme editor, the code editor, or a theme app — those changes are automatically committed back to the branch by a shopify bot. This can't be disabled. If you need to keep other code separate from what Shopify can see, use a repository dedicated to your theme.
Step 5 — Connect Claude to the repository
Connecting Claude takes two things, and both are required:
Adding the GitHub connector in Claude signs you in and proves who you are.
Installing the Claude GitHub app grants access to repository contents.
Identity alone isn't enough. Until you've installed the app and selected your repository, Claude won't be able to see your code. Most setup problems come down to skipping the second part.
Important: the GitHub connector in Claude's built-in connector directory is not enough on its own - it won't reach a private theme repository. You need to add GitHub as a custom connector using the URL below. If you've already connected the directory version, leave it or remove it; either way, add the custom connector as well.
Add the GitHub custom connector in Claude
Use the GitHub account that owns your theme repository, or one that has access to it.
In Claude, go to Customize → Connectors.
Click the + button next to Connectors, then choose Add custom connector.
Name the connector
GitHub Connector.Paste this as the MCP server URL:
https://api.githubcopilot.com/mcpClick Add, then click Connect on the new connector and follow the GitHub authentication prompts.
On Team or Enterprise plans, an Owner or Primary Owner adds the custom connector once for the organization first:
Go to Organization settings → Connectors.
Click Add custom connector at the bottom of the page.
Enter the name and the MCP server URL above, and add it for your team.
Adding the connector makes it available to your team but doesn't grant anyone access on its own. Each person still authenticates individually, using the steps above.
Install the Claude GitHub app
Install the Claude GitHub MCP Connector app on the account or organization that owns your repository. This app is published by Anthropic and is what lets Claude reach GitHub's official MCP server.
On the installation screen, grant it access to your theme repository.
Back in Claude, ask it to check the connection — something like
can you see owner/repo-name?It should be able to describe the repository and what's in it. If Claude says it can't find the repository, the two most common causes are: the custom connector wasn't added (only the directory GitHub connector was), or the Claude GitHub MCP Connector app was installed on a different account than the one that owns the repo.
Step 6 — Confirm the connection works
Test the Shopify side of the sync:
In Shopify, go to Online Store → Themes and click Customize on your connected theme.
Change any theme setting and click Save, then exit the theme editor.
On the theme card, click the branch name to open GitHub. The most recent commit should list the
shopifybot as its author.
Then test the Claude side by asking Claude to describe a specific file in your theme — for example, what's in layout/theme.liquid? If it can read the file, Claude has access to your theme code and the Tech Diagnosis skill can work with it.